Mechanism for Circulation of Confidential Materials: 2b. Microsoft OneDrive & SharePoint
The purpose of this document is to outline the two online platforms available at the University of Toronto (UofT) that are appropriate for the secure online sharing of confidential materials to specific named people, e.g., Tenure Committee members, or Continuing Status Review Committee members.
Please see the step-by-step instructions below on how to access, create, upload, and share an online folder that contains confidential materials.
About the Platforms
Both OneDrive and SharePoint are part of the Microsoft 365 (M365) suite that all staff and faculty have access to at UofT. Using your University of Toronto M365 account to share confidential documents is easy, fast, and secure.
OneDrive
The OneDrive platform is accessible from any device and allows the owner to control the sharing rights of the documents and grant access to specific people. All staff, faulty and students have access to OneDrive and the files are stored on your own personal OneDrive.
SharePoint
SharePoint is a cloud-based platform that provides a secure place to organise and share confidential materials in a controlled manner. It is available to staff and faculty who have been migrated to M365 and is operated and managed by central Information Technology Services (ITS). Designated staff members act as “site owners” who manage their site according to required needs.
Controlled Sharing
Within both platforms, all confidential materials should be shared with named individuals only, and each member should be given “read only” access, i.e., no edit rights.
Access
OneDrive
You do not need to request access to OneDrive. To access it, log in to your online M365 Outlook account using your UTORid credentials, as you would for most other University systems. Once you’ve logged in to M365, you will start in your online Outlook email inbox.
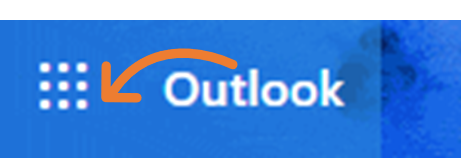
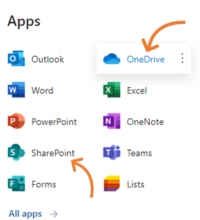
In the top left corner, you will see the blue “waffle” icon, which is your doorway to other online M365 apps, tools, and services. Click on the “waffle” icon and from the available apps select the “OneDrive” tool. You will likely see some default folders already listed in your OneDrive. If you’ve used OneDrive or any of the other online versions of Microsoft Office (such as Word Online or Excel Online), or shared documents via Teams, you may see other files or folders when in your OneDrive.
SharePoint
For SharePoint access, the staff member who will be the designated owner should contact their local/divisional IT services to inquire about getting a new SharePoint site for each separate purpose. If you do not have a local IT group, you can request a site in the IT Service Centre.
Once the SharePoint site is created, you can access the platform by selecting the tool via the “waffle” icon as outlined above. From the SharePoint launch page, click on the “globe” icon in the far-left menu to see a list of your frequently accessed SharePoint sites.
Create a Folder
The whole process should take a few minutes (not including creating the content).
There are several different pathways to create a shareable folder or file, but for the purposes of sharing confidential documents we are recommending that you create a separate folder for each purpose, e.g., one folder for each tenure candidate, one folder for your annual workload letters/assignments. This is so that owners can control exactly who has access to the materials in each folder.
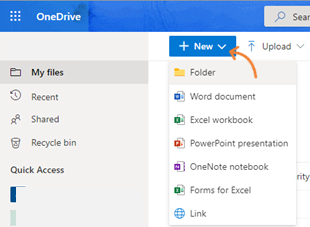
To create a new folder for a specific purpose, click on the “New” button, and then select “Folder” from the drop-down menu. You will then be prompted to name the folder. For e.g., “2022-23 Unit workload assignments”, or “[NAME] – Tenure Dossier – 2022”.
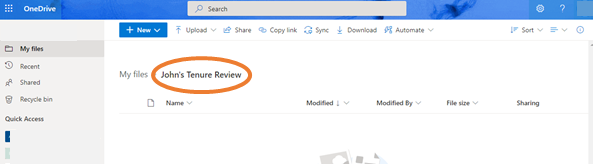
Once created, the new folder will show on your “My files” list. Double-click on the folder name to enter the empty folder.
Note: you can see from the “file path headline” circled that you are now inside the newly created folder.
Organise a Folder
Tenure Dossiers
For tenure dossiers, it is best to organise the folder with sub-folders in the order shown on the tenure checklist.
CSR Files
For CSR files, it is best to organise the folder with sub-folders in the normal order.
Workload Letters/Assignments
Each academic unit should decide how best to structure the folder to suit its own needs. The folder should be accessible to all faculty members or librarians in the unit. The letters/assignments will normally only be available for the current year, and only accessible to appointed faculty members or librarians in the unit.
A suggested naming convention could be “2022-23 [NAME OF UNIT] workload assignments” for the main parent folder, then each assignment named “[SURNAME]_[FIRST NAME]_2022-23_workload”.
Upload Documents
You can now start to add a file to the folder. It is recommended to upload materials exclusively as “read only” PDFs.
Existing Document
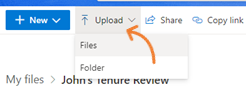
The most likely scenario is that you have existing files on your computer. Click on the “Upload” menu and begin the standard process for uploading a file. You will be prompted to find the file on your hard drive, select it, and upload to the folder. By default, the uploaded doc will retain the name of the file from your hard drive.
New Blank Document
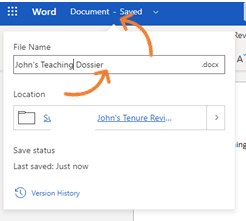
Alternately, if you are creating a new blank document, select “Word document” from the “New” menu. A new blank Word Online document will open, and you can begin typing and/or pasting in content. Rename the file by clicking on the temporary file name “Document” and insert a new file name. This Word doc should be saved as a PDF once complete.
Once the new file is uploaded or saved, you will now see the file inside the folder. Repeat the same steps to upload all the necessary files for the specific process.
Share Securely
In your list of “My files”, the “Sharing” column on the far-right side defaults to “Private”. This means only you have the permissions to access the folder. The same is true for the files within the folder.
At this point, you have a couple of choices on how to share the content.
Share a Folder
Use this scenario if you have more than one file to share. This will allow you to share all the files within a specific folder.
While inside the folder you want to share, click on “Share”.
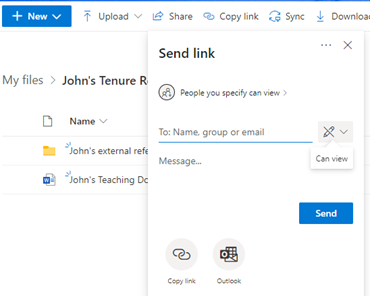
You will be prompted with a dialogue box asking you the names or email addresses of the people with whom you’d like to share the folder.
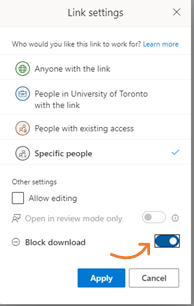
As these materials are “read only” for very specific people, we recommend you select the “People you specify can view” option. Begin entering all the names/email addresses for the individuals who should have access to these confidential materials. The default setting will show “Can view” (i.e., cannot make changes); ensure this is selected.
Share a File
Alternatively, you can, from within the file itself, select the “Share” option near the top right and use that dialogue box to identify specific people. Be sure the “Can view” option (instead of “Can edit”) is selected to maintain “read only” permissions for everyone.
Prevent Download
To prevent the download of the materials, you must change the settings on each file individually. In the link settings of the “Share” dialogue box for the file, be sure the “Block download” option is turned on for each file. You would then need to share these items at the file level to prevent download. You are unable to block download at the folder level.

Manage Access
At any point thereafter, while inside the file or folder, you can see who has access to the file in the “Details pane”. Click on the “i” icon on the top right corner to open the “Details pane”, or right click on the file or folder of your choice. Click on “Manage access” to view/edit access permissions. You can also view the activity within the file or folder in this pane.
Complete the Process
When the process is complete, or the work of the Committee is finished, please be sure to delete the posted materials from each folder in OneDrive/SharePoint for which you are the owner, being careful to retain a full copy of the files for your records.
For workload letters/assignments, best practise is to delete the letters/assignments from previous years when uploading the new year.
Getting Help
If you have any non-technical questions on this method of secure online sharing of confidential materials, please contact the VPFAL Office at vp.fal@utoronto.ca.
For technical questions and issues, please reach out to the appropriate help desk for Microsoft 365 support.
Resources
Some helpful resources are available from the Enterprise Applications and Solutions Integration (EASI) team, including:
- EASI’s OneDrive webpage
- EASI’s SharePoint webpage
- EASI’s Microsoft 365 Training Centre
- Connect+Learn – UofT’s lunchtime training series for staff, focusing on Microsoft tools
- Further UofT Microsoft 365 resources are available online